YourEmails™ Help file
This help file covers the following topics:
1. Installation
2. How to use YourEmails
2.1. Filing options
2.1.1. File message with attachments
2.1.2. File message and attachments separately
2.1.3. Move message to Outlook folder only
2.2. Sending and receiving options
2.2.1. Move received messages to Outlook folders
2.2.2. File sent message
2.2.3. Move sent message to Outlook folder
2.3. General Options
2.3.1. Disable security warnings for filed attachments
2.3.2. Add category to filed message (labelling)
2.3.3. Edit naming pattern
2.3.4. Suggested locations
2.3.5. Edit disk locations
2.3.6. Edit Outlook locations
3. Activation of a full version
4. Troubleshooting
4.1. Buttons not visible in Outlook
1. Installation
|
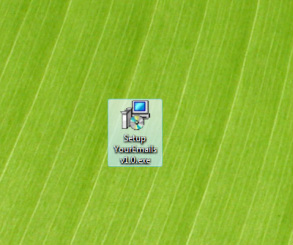
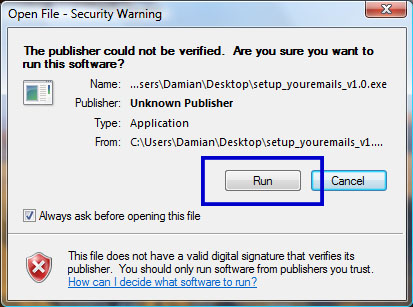
- Download the latest version of YourEmails here - Locate the downloaded file (it should be called: setup_youremails_vX.X.exe where X.X is version number) - Make sure Outlook is closed - Double click the downloaded file |
|
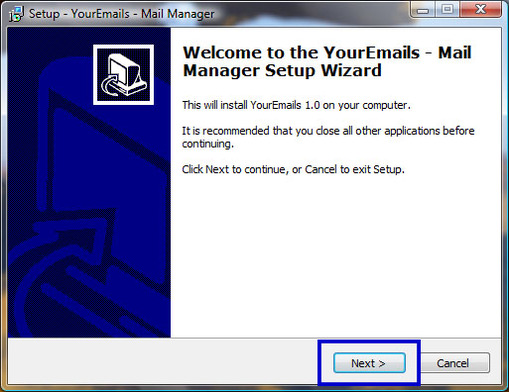
- Installer window will pop up - Follow on-screen instructions - Once installed click Finish button - Open Outlook - NOTE 1: if you installed YourEmails through 'Run as Administrator' command then you will have to log out and log in again for the add-in to work - NOTE 2: if you do not have admin rights then for auto sorting to work your administrator must give you permission to modify Program Files/YourEmails folder. |
2. How to use YourEmails
2.1. Filing Options
There are three filing methods. Only one method can be selected at any one time. The principles of a selected filing method also apply to filing sent messages (if this is selected). The methods are:
2.1.1. File message with attachments
E-mails are filed on the system (local or network drive) in their original form, with attachments if these are present. This works the same as Outlook's native save as function. Once an e-mail is selected and filing initiated then a window will pop up where you can select destination location (called filing location) for filing on the system. This method allows to select Move to Outlook folder option. If this is selected then, after a system filing location is selected, a window will pop up where you can select an Outlook (sub)folder where the e-mail should be moved. This works the same as Outlook's native 'move message' function. However, it also generates a filing history which can be used for auto sort incoming e-mails - see below. This filing option allows e-mails to be automatically labelled - see below.
2.1.2. File message and attachments separately
E-mails are filed on the system (local or network drive) with attachments filed separately. Filed e-mails include hyperlinks to filed attachments. Once an e-mail is selected and filing initiated then a window will pop up where you can select destination location (called filing location) for filing on the system. Attachments and message will be filed in this system folder. This method also allows to select Import stripped message back to Outlook - if this option is selected then filed e-mails are imported back to Outlook, and iclude hyperlinks to filed and removed attachments. This way filed messages are accessible in Outlook but size of mailbox is significantly reduced. Another option is to Move to Outlook folder - if this is selected then, after a system filing location is selected, a window will pop up where you can select an Outlook (sub)folder where the e-mail should be moved. This works the same as Outlook's native 'move message' function. However, it also gathers filing history data which can be used for auto sort incoming e-mails - see below. This filing option allows e-mails to be automatically labelled - see below.
2.1.3. Move message to Outlook folder only
E-mails, in their original form, are moved to Outlook (sub)folder. This works the same as Outlook's native move message function. However, it also gathers user's filing habits and generates a filing history which can be used for auto sort incoming e-mails - see below. This method does not remove attachments. Also labelling does not apply to this method - see below.
2.2. Sending and receiving options
Options for moving (sorting) and filing incoming and sent e-mails. The options are:
2.2.1. Move received messages to Outlook folders
Automatically moves (sorts) incoming e-mails to Outlook (sub)folders. This is based on relevancy points which are allocated to 'filing' locations based on user's actions. But before this function can be effective you have to teach YourEmails where certain e-mails should be moved. This is independent of filing feature and is done by selecting received message and clicking Move to Outlook folder button. Next select a move location within Outlook. This way you told YourEmails that messages with this subject, project number and/or sender should be moved to that certain Outlook folder. A filing history is generated and updated each time an e-mail is moved to this move location. Next time a message with the same subject, or project number, or sender is received then it will receive relevancy points and if a specified threshold (editable in Settings) is met then it will be moved to a move location that got the highest relevancy score.
If, by mistake, you move e-mails to a wrong location then you will have to relocate it by using the Move to Outlook folder button so that YourEmails is told that this message should be moved to a different location. The filing history assigned to this folder will be revised and a correct number of relevancy points will be allocate. This may have to be done for the next few messages so that you overwrite the filing history associated with the location to which you moved e-mails by mistake.
If this function does not work correctly then there is an option to adjust how relevancy points are allocated. Different number of points can be allocated based on the following matches: sender's name or address (received e-mails), recipient's name or address (sent e-mails), subject, project number (exact match or partial match). At the beginning of using YourEmails it is recommended to have this function turned off so that YourEmails has time to learn user's filing habits.
Once YourEmails learnt your filing habits it will be able to automatically move incoming e-mails to relevant folders. It is not necessary to create and maintain rules if this option is selected.
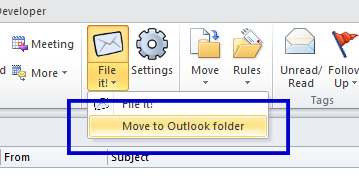
Move to Outlook folder button can be found here (in Outlook 2000 and 2002 there is a separate button called Move):
2.2.2. File sent message
Once a new e-mail is created and Sent button is pressed then a window will pop up where you can select a location for filing the e-mail on the system. This window includes a Send only button and if it is pressed then the sent e-mail is not filed and is moved to Sent folder as normal. File sent message also includes an option to Keep copy in Sent Folder. This means that if an e-mail is filed then it is not removed from Outlook but a copy is kept in Sent Folder - just as like the standard Outlook's procedure for dealing with sent e-mails. File sent message option allows e-mails to be automatically labelled - see below.
2.2.3. Move sent message to Outlook folder
This can be combined with filing sent messages. Additional window will pop up where Outlook location can be selected when sending an e-mail. For example to project specific subfolder in Sent Items folder. This speeds up sorting sent e-mails. Automatic labelling cannot be applied to moved only messages unless these were filed on the system at the same time - see below for explanations.
2.3. General Options
2.3.1. Disable security warnings for filed attachments
When e-mails and attachments are filed separately and attachment is opened through a hyperlink within the filed e-mail then a warning message may be displayed if Outlook decides that the content is potentially harmful. It is recommended to keep this option ticked so that these warnings do not pop up.
2.3.2. Add category to filed message (labelling)
A category can be automatically assigned to e-mails filed on the system (sent or received e-mails). This is fully customizable as uses Outlook's native category function. Labelling cannot be assigned to e-mails moved within Outlook (as opposed to filing on the system). This is to not confuse users as automatic labelling is only intended to distinguish e-mails that can be safely deleted from Outlook once not required (i.e. closed project or emails are too old).
2.3.3. Edit naming pattern
E-mails filed on the system will have a specific file name, for example 2013.04.04_DamianJanicki_Re: Introducing YourEmails. File name can be adjusted using this option, you can choose to include: subject, sender's name, importance, number of attachments, date and time of sent/received e-mail. This option should be used to meet you office specific Quality Assurance procedures.
2.3.4. Suggested locations
Allows you to adjust relevancy points that are allocated to filing folders through a use of filing history. Each filing folder has a separate filing history.
2.3.5. Edit disk locations
The main function in YourEmails (together with edit Outlook locations) where you can add, edit and remove filing folders (locations) which are then displayed in filing windows that pop up whenever you file received e-mail or send a new e-mail (if filing sent message option is selected). Disk locations refer to system locations like on your local hard drive or network drive if you file e-mails at work. New system folders can be created straight from YourEmails.
2.3.6. Edit Outlook locations
As above but relates to folders (move locations) within Outlook. New system folders can be created straight from YourEmails.
3. Activation of a full version
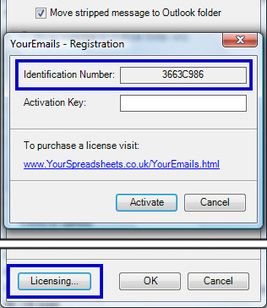
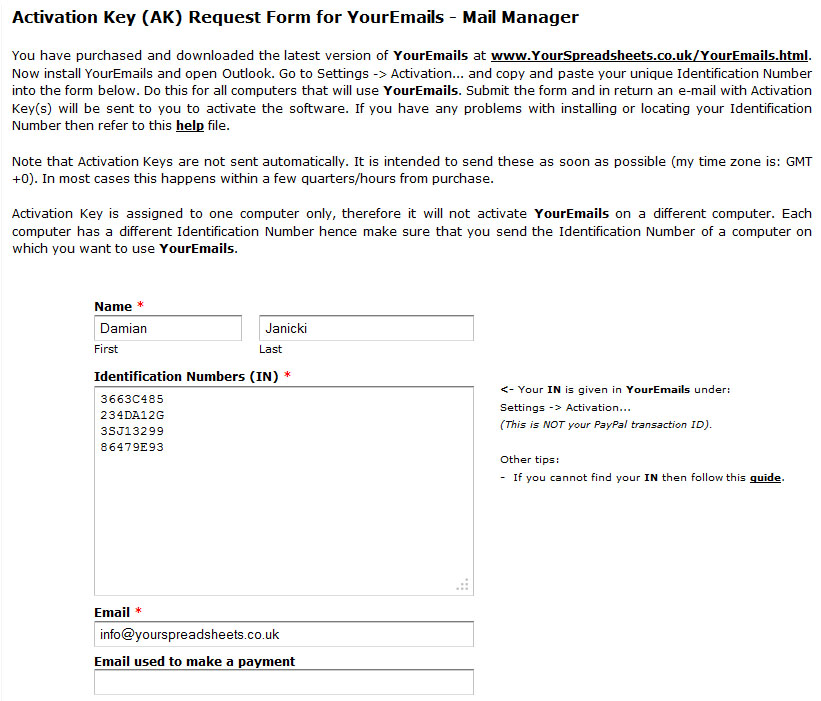
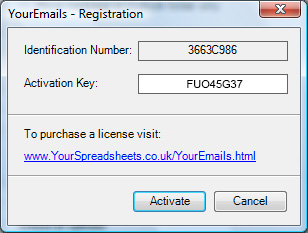
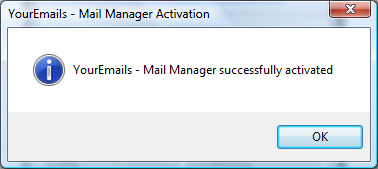
3.1. The installation file in Download Section here includes a free 14-day trial. During these 14 days you can use all functions of the full version of YourEmails. After that time you will still have access to Settings where you can adjust your filing folders etc but you will no longer be able to sort or file e-mails using YourEmails. To continue using this Outlook add-in you will have to purchase a license and activate your copy of YourEmails. The process is very simple and is described/illustrated below:
|
- and fill in this Activation Request Form - if you purchased more than one license then paste Identification Numbers of all computers that are to use YourEmails. But make sure to submit only one Activation Request Form. |
4. Troubleshooting
4.1. If YourEmails installed correctly on your computer but nothing changed in Outlook, i.e. you do not have additional buttons like on the below screen captions:
(NOTE: if you installed YourEmails through 'Run as Administrator' command then you will have to restart your computer for the add-in to work)
Outlook 2007:
Outlook 2010:
Outlook 2013:
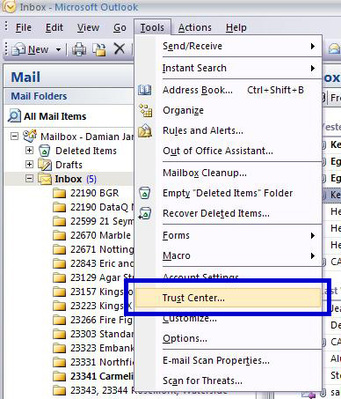
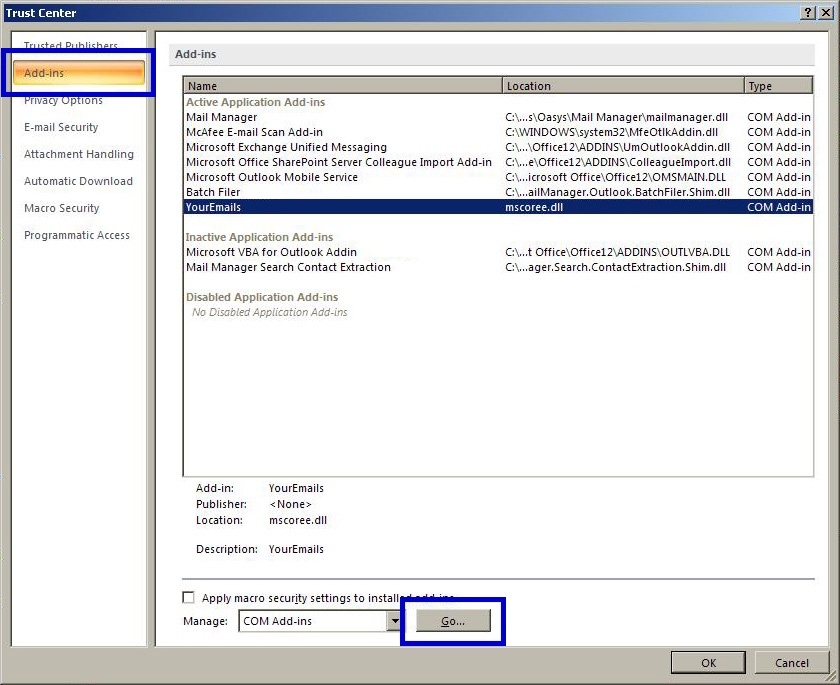
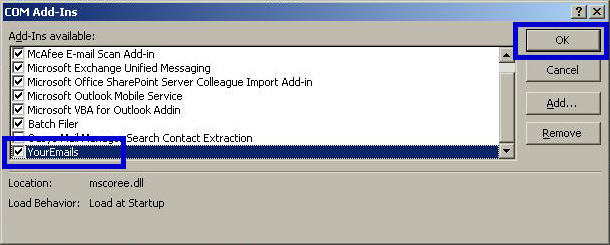
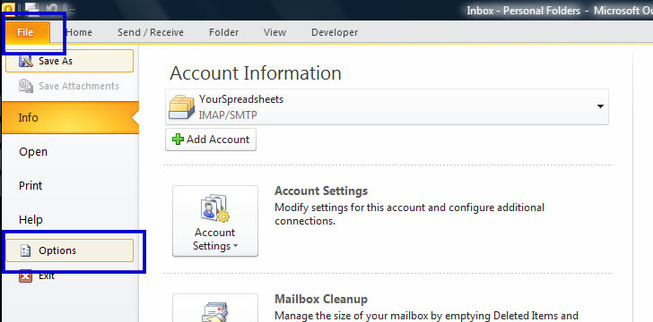
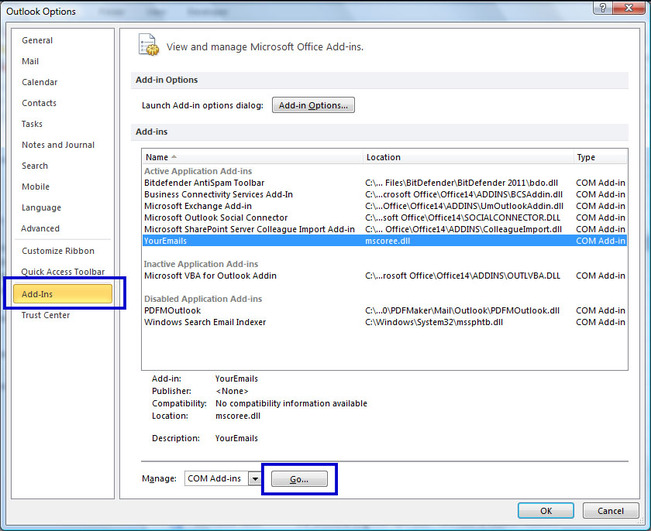
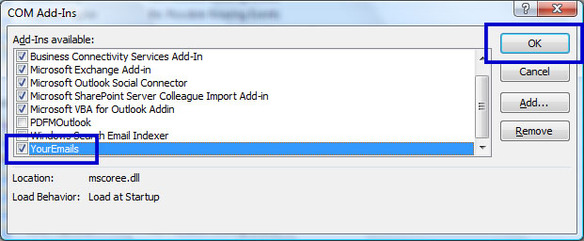
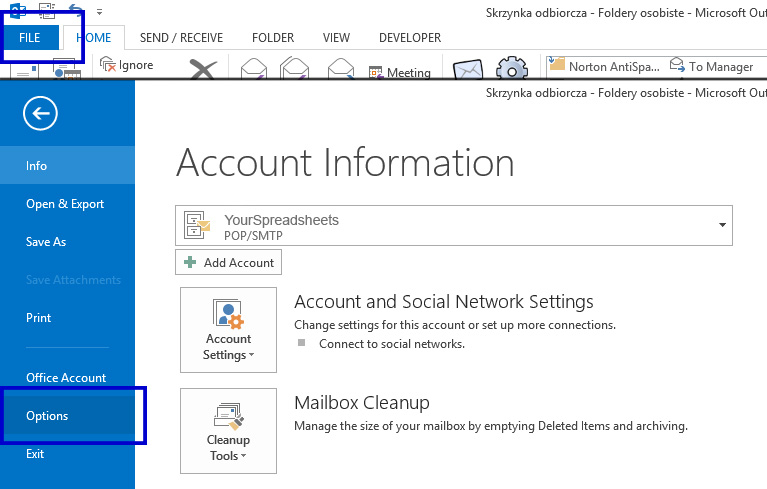
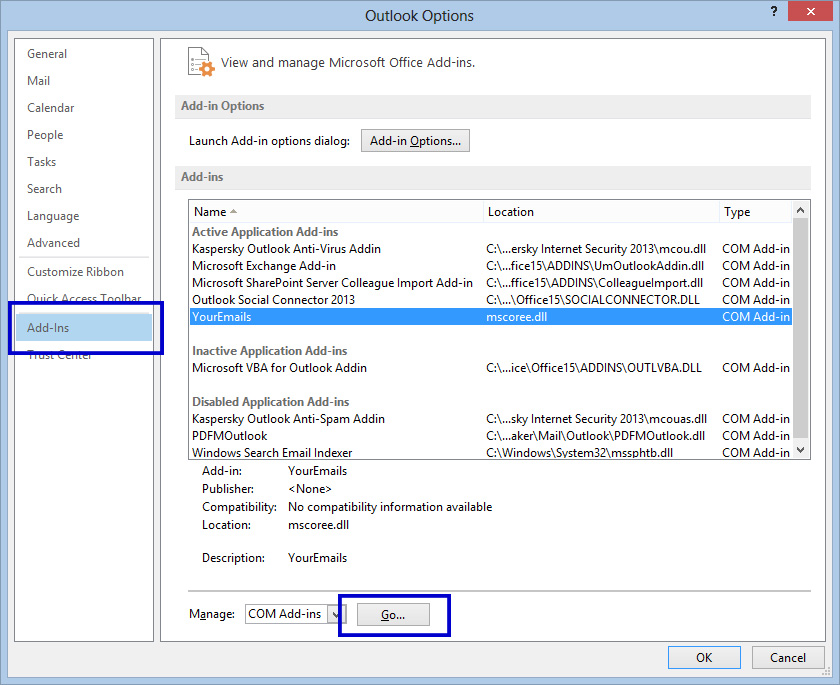
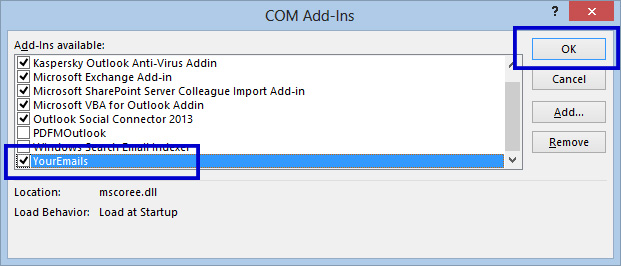
Then it did not activate correctly on your Outlook. Follow these steps to do this manually:

